The fact that I'm writing this tutorial kind of cracks me up. My friend G. is slightly... Shall we say... Craft challenged. I recently posted a picture of the Japanese lantern jack o' lantern that my 3 year old daughter made (with my help) on my Facebook.
My friend asked for a link with instructions. I didn't have one. I tried to explain how simple this project was, because, I mean, surely everyone knows how to make a Japanese lantern, right? But then, I remembered her own description of her ineptitude with crafts and thought that perhaps... Well, anyway. Here I am, with pictures, to demonstrate this simple, fun, preschool (or any age!), Halloween craft!
My friend asked for a link with instructions. I didn't have one. I tried to explain how simple this project was, because, I mean, surely everyone knows how to make a Japanese lantern, right? But then, I remembered her own description of her ineptitude with crafts and thought that perhaps... Well, anyway. Here I am, with pictures, to demonstrate this simple, fun, preschool (or any age!), Halloween craft!
1. Okay. So, first, you're going to need some orange paper. We just used orange construction paper, but if you're terribly artistic, I suppose you could use scrapbook paper with a pretty pattern on it or something a little fancier. :-)
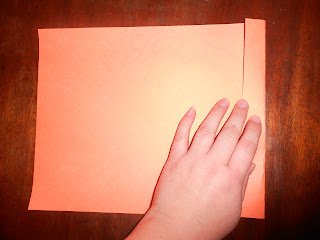
2. Our lantern needs a handle, so before we do anything else, we need to fold up a 1" (roughly) piece of the paper to give us a sort of straight mark to cut this off.
3. Trim off the 1" strip along the short edge along the crease that you made. Reserve this strip for later use as the handle for your lantern.
4. Let your artist draw their jack o' lantern face onto the remaining large piece of paper. In this instance, I was in a hurry, so I scrawled a quick one myself. For young children, you might draw the outline, and let them color it in. I am usually going for process over product, personally, so if I can convince mine to do it, I make them draw their own, even if they complain that it won't be "perfect." Another option would be to let them paint it, or to have sponges pre-cut into triangles and let them stamp. Anything goes.
5. okay, once the face is complete, you want to fold your paper in half, the long way. (Hot dog fold.)
6. Now we're ready to start cutting. You're going to make parallel cuts along the folded edge about 1" apart all the way across your jack o' lantern.
Be sure not to cut all the way through, but to leave about an inch of uncut paper at the top to hold it all together.
7. Now that you've cut all the way across, unfold your jack o' lantern. It should look something like this:
8. Now the assembly begins. Loop your paper around so that the short edges are over lapping, as seen in the picture below. You'll want enough overlap so that you can staple (Or tape, or glue, but I think stapling is the most expedient) each end.
When you staple both ends and turn it around, it should look something like this:
9. Attach the handle at the top with a staple on either side, so that the face is centered. That's it! Your Japanese lantern is complete and can be hung anywhere for a very cute holiday decoration! :-)
I forgot a step!
10. Take a picture of your munchkin with their creation. They'll love that they made this simple Halloween craft with minimal help from you, and they'll be excited to hang it somewhere to decorate for the holiday!
Happy Crafting!


